Outdoor Lighting Planning Basics
Outdoor lighting planning for backyard spaces starts with clear priorities—safety, security, ambiance, and usability—so every fixture serves a purpose instead of just filling space. We focus on function first, then refine the visual impact. In Minnesota’s long, dark seasons, we build practical plans that address layout, fixture type, weather durability, and budget to ensure reliable performance year-round.
Key Takeaways
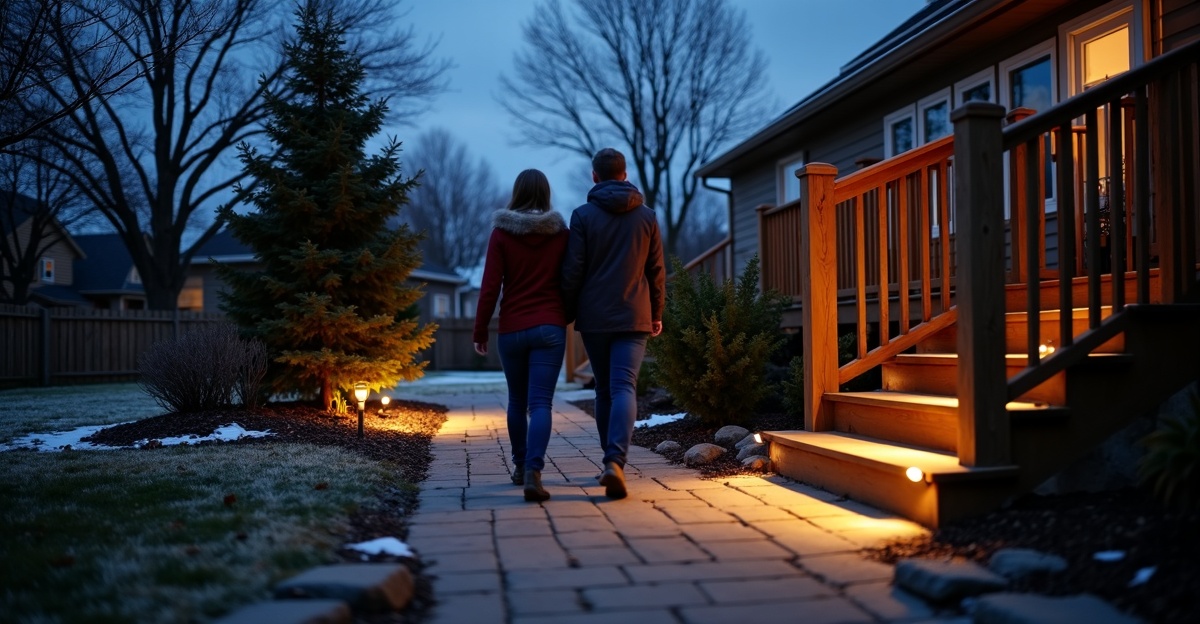
- Start with safety and security by lighting stairs, walkways, entry doors, and grade changes before adding accent features. We treat these areas as non-negotiable because they reduce liability and improve daily comfort.
- Identify priority zones with a simple layout sketch to keep the project focused and functional. We map traffic patterns, gathering areas, and sightlines so each fixture supports how we actually use the yard.
- Choose durable, low-voltage LED fixtures and space them properly to avoid glare, dark gaps, and premature winter damage. We position lights for even coverage and select materials that handle moisture and temperature swings.
- Plan for Minnesota’s weather by considering freeze-thaw cycles, snow depth, and year-round use patterns. We install fixtures and wiring with winter conditions in mind so the system performs through every season.
- Set a realistic budget and phase installation if needed, focusing first on high-traffic and high-risk areas. We prioritize essential zones, then expand with feature lighting once the core system operates reliably.
Start With Your Main Goals: Safety, Security, and Usability First
Strong outdoor lighting begins with clear priorities. Outdoor lighting planning for backyard spaces should always start with four goals: safety, security, ambiance, and usability.
Safety comes first. We want to prevent trips on stairs, uneven pavers, and sloped walkways. Security follows close behind. Entry doors, garage approaches, and side yards should feel visible and controlled after dark, which aligns with U.S. Department of Justice crime prevention guidance recommending exterior lighting around access points. Ambiance matters too, but it should never compromise function. Usability ties it all together by extending patio and deck time well after sunset.
In Minnesota, daylight fades early in late fall and winter. By the time many families get home from work, it’s already dark. That makes safe passage along driveways, steps, and walks essential for months at a time.
We often recommend walking the yard at night before making any decisions. Turn off interior lights and step outside. Notice the dark spots. Check for glare from existing fixtures. Pay attention to areas that feel uncomfortable or hard to navigate. Homeowners across Shakopee and Scott, Carver, Dakota, and Hennepin Counties are often surprised by what they see—or don’t see—once the sun goes down.
Lighting isn’t purely decorative. Good backyard landscape lighting ideas blend comfort with visibility and long-term value. A well-lit yard supports everyday routines and helps protect the investment made in hardscapes, plantings, and structures.
Working with a Minnesota outdoor lighting contractor helps keep that balance in focus from day one.
Identify Priority Zones in Your Backyard Layout
Before selecting fixtures, we outline where lighting matters most. A simple backyard lighting layout plan keeps the project practical and focused.
Start by identifying high-use areas:
- Patios and decks
- Walkways and driveways
- Stairs and grade changes
- Retaining walls
- Seating areas
- Entry points and garage doors
Patio lighting design in Shakopee is one of our most common requests. Families want their dining and seating areas usable on summer evenings without harsh overhead glare. Layered lighting works best here. Soft perimeter lights define the edges. Subtle uplighting can frame nearby trees. Task lighting near grills or outdoor kitchens improves function without overpowering the space.
Walkway lighting installation deserves close attention, especially where grade changes occur. Even a small elevation shift can become a hazard in winter. Proper spacing avoids dark gaps while keeping the look clean and intentional.
Retaining wall lighting ideas often include integrated step lights built directly into vertical faces. This reduces shadowing on stair treads and helps guests see exactly where to place their feet.
We suggest sketching the yard before meeting with a contractor. Mark high-traffic routes in one color and accent areas in another. Bring that sketch to the conversation. It keeps the focus on practical needs first.
During on-site walkthroughs, we check sightlines from all angles. That includes inside the house and from the neighbor’s yard. Well-planned lighting should guide movement and highlight features without shining into bedroom windows or spilling light across property lines.
For homeowners updating patios or walls at the same time, coordinating lighting with hardscape construction creates cleaner integration and fewer retrofits later.
Choose the Right Fixtures and Layout for Long-Term Performance
Fixture type and placement determine how the yard feels at night. We keep explanations straightforward so every homeowner understands the purpose behind each choice.
- Path lights guide foot traffic along walkways and around planting beds.
- Uplights highlight trees, stonework, or architectural features.
- Downlights mount higher in trees or structures to create a soft moonlight effect.
- Step lights build directly into stairs or walls to improve safety.
Spacing matters as much as selection. Fixtures placed too close together create bright hotspots and harsh contrast. Units spaced too far apart leave dark gaps that defeat the purpose. Over-lighting is a common mistake. A yard should feel comfortable and balanced, not washed out.
LED landscape lighting systems are now standard for residential installationsbecause U.S. Department of Energy research on LED lighting efficiency and lifespan shows they use less electricity and last significantly longer than traditional lighting. They last longer, use less energy, and provide consistent color. That reliability becomes especially important in harsh climates.
Most residential systems in Minnesota use low-voltage outdoor lighting, which electrical safety organizations commonly recommend because low-voltage landscape lighting systems reduce shock risk in residential environments. Low-voltage setups are generally safer and more flexible for landscape applications. They allow for easier adjustments and expansions over time compared to traditional line voltage. For most backyard projects, low-voltage is the practical and proven choice.
Weather-resistant outdoor light fixtures are essential here. We look for corrosion-resistant materials and sealed housings that keep moisture out. Cheap fixtures may look fine at installation, then fail after one freeze-thaw cycle.
Another oversight involves winter maintenance. Fixtures placed too low can be buried by snow. Units installed near driveway edges may get damaged by plows or snow removal equipment. Placement must account for how the yard functions year-round, not just on a summer evening.
Homeowners planning broader upgrades can review how to design an outdoor living space to see how lighting fits into the bigger picture.
Plan for Minnesota Weather and Seasonal Use
Minnesota weather tests every outdoor system. Freeze-thaw cycles affect soil stability, wiring depth, and fixture alignmentt, a common ground movement issue explained in MKB Company guidance on freeze-thaw soil cycles. If wiring isn’t installed correctly, ground movement can strain connections over time.
Snow accumulation changes how light spreads across the yard. Path lights set too low disappear under a heavy snowfall. Slightly taller fixtures or adjusted placement can maintain visibility even in January.
Freezing temperatures and moisture demand properly sealed connections. Exposed splices or low-grade components lead to corrosion and early failure. We take extra care at every connection point because small shortcuts show up quickly in this climate.
Seasonal use patterns also shape design choices. Summer entertaining often centers around patios, grills, and seating walls. Winter priorities shift toward driveways, garage entries, and front steps. A smart plan supports both.
Durability drives every recommendation we make. Trend-based fixtures may look appealing in a catalog, but if they can’t withstand multiple Minnesota winters, they don’t belong in the yard. Quality materials and solid installation practices provide long-term value and fewer headaches down the road.
For larger projects, coordinated full project management keeps lighting, hardscape, and planting work aligned from start to finish.
Set a Realistic Budget and Understand What Drives Cost
Clear expectations around budget make the planning process smoother. Outdoor lighting costs vary based on several practical factors.
- Property size influences wire runs and transformer capacity.
- Fixture count and quality affect total investment.
- Wiring complexity and labor time add to overall pricing, especially in established landscapes.
Higher-grade fixtures cost more upfront but typically last far longer. Inexpensive fixtures often fail after one winter in freeze-thaw conditions. Replacing them repeatedly costs more over time. Investing in durable components protects both safety and appearance.
Phased installation works well for many homeowners. Start with priority safety zones such as stairs, primary walkways, and entry doors. Add accent lighting and extended zones later as budget allows. This approach keeps the system expandable without redoing earlier work.
For added clarity, homeowners can review a backyard budget planning guide before meeting with a contractor. Coming prepared with a rough range and goals leads to more productive conversations.
Transparent pricing and straightforward explanations help homeowners feel confident. Every yard is different, so we align recommendations with how the space actually gets used.
Avoid Common Mistakes and Prepare for a Productive Consultation
We see the same issues repeat across many properties. Avoiding them early saves time and money.
Common mistakes include:
- Over-lighting the yard and creating glare
- Ignoring stairs and grade changes
- Choosing inexpensive fixtures that fail after one winter
- Installing fixtures that become buried by snow
- Poor placement that shines into windows or neighbors’ yards
A little preparation makes consultations more useful. Gather inspiration photos. List primary goals in order: safety, security, ambiance, usability. Create a simple backyard lighting layout plan marking high-traffic routes and focal points.
Understanding common landscaping mistakes to avoid also helps align lighting with the broader yard plan.
The next step doesn’t require pressure or commitment. Evaluate the space at night. Clarify priorities. Then schedule a walkthrough if the timing feels right. A hands-on review from consultation to final walkthrough ensures lighting makes sense for the property, the climate, and the way the yard truly gets used. When ready, reach out through our contact page and start the conversation.
Frequently Asked Questions
The best way to plan outdoor lighting for a backyard is to start with safety and high-traffic areas before adding decorative lighting. Focus first on stairs, walkways, entry points, and patios. Then map how people move through the space and place fixtures to guide movement and reduce dark spots. Once essential lighting is in place, add accent lights to highlight trees, walls, or landscape features.
The number of lights needed depends on the yard size, layout, and the areas you want to illuminate. Most backyard lighting plans include fixtures for paths, seating areas, entry points, and key landscape features. Instead of filling the yard with lights, use strategic spacing to create balanced coverage. Proper placement usually requires fewer fixtures while still improving visibility and atmosphere.
Low-voltage lighting is generally the preferred choice for backyard landscape lighting systems. It uses less electricity, produces consistent LED light output, and is safer for residential outdoor installations. Low-voltage systems are also easier to expand or adjust if you add features later. Because of their efficiency and flexibility, they are commonly used for path lights, uplights, and patio lighting.
Outdoor lights should be placed along walkways, stairs, patios, and entry areas where people regularly move at night. Position path lights to guide traffic, install step lights on stairways or retaining walls, and use uplights to highlight trees or architectural elements. Avoid placing fixtures where they shine directly into windows or create glare that reduces visibility.
Backyard outdoor lighting costs vary based on property size, fixture quality, and installation complexity. Smaller projects with basic path and patio lighting can cost significantly less than larger designs with multiple zones and accent lighting. Durable fixtures and professional installation usually cost more upfront but provide better long-term reliability and lower maintenance over time.